 |
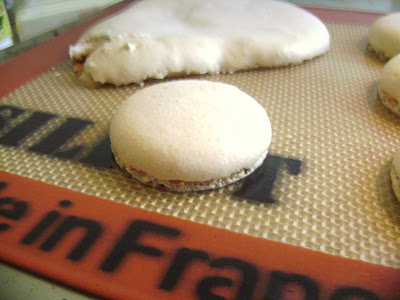
| At the front left corner you can see what happens when you try to peel off a macaron before they've cooled... |
|
|
This was my third try for macarons; the second try had come out behaving very much like meringue, and the first try spread into weird little misshapen puddles and kind of burned on the bottom. Delicious misshapen burnt puddles, but on a certain level with the macaron shells taste is only half the battle, perhaps even less. The other key elements to a macaron, as far as I can tell, are a) visual appeal: smooth, lustrous surface and development of a solid pied, the little crackly 'foot' at the base of the shell which I will discuss further in a minute, and b) mouthfeel: a somewhat crisp shell with a softer almost fudgy center. The goal here is to avoid gummy chewiness or the texture of a meringue by observing a proper period of macaronnage, a process in which the batter is repeatedly spread against the side of the bowl in order, again as far as I can tell, to reduce air bubbles and create a molten lava-like texture in the batter.
So third time is apparently the charm! What I did differently for this batch from the previous ones was
not overbeating the meringue and
macaronnage-ing like it was my job.
 |
| The payoff? Smooth tops, solid pied. |
 |
| Pied! Yes! |
The recipe I use for macarons is from I Heart Macarons by Hisako Ogita. As are most Japanese sweets cookbooks, this book is pretty precious with beautiful photographs and extremely cute ideas for presentation. There are plenty of flavoring instructions for shaking up the plain macaron shell base, including green tea, black sesame, raspberry etc.
The book also includes instructions for making many different flavors of buttercream to be sandwiched by the macaron shells, although I have always had leftover buttercream to use. Also in the book are suggested flavor combinations that look pretty incredible. Maybe I'll get adventurous next time!
Italian Meringue Macarons (Makes about 12 sandwiched macarons)
2/3 cups ground almonds
1 1/2 cups powdered sugar
2 Tbsp water
5 Tbsp granulated sugar
3 lg egg whites
1 tsp vanilla
Sift together the ground almonds and powdered sugar three times. Set aside.
Boil the granulated sugar and water until it reaches 240°. As soon as it does, start whipping the egg whites at high speed. Beat until they reach the soft peak phase, at which point the sugar syrup should be around 248°-250°. Slowly pour the sugar syrup into the egg whites with the mixer still going, pouring it down the side of the bowl in order to avoid splattering on the beater. Turn up the mixer to high speed and beat until the bottom of the bowl is cool to the touch.
Fold in half of the sifted sugar and almond mixture and fold in until just incorporated. Fold in the remaining sugar and almond and begin the macaronnage.
For Macaronnage:
Scoop up the batter with a spatula and press it along the side of the bowl. Repeat about 12 times, although you want to look for a very particular consistency, like of molten lava, and if you haven't achieved it after 12 turns, keep going.
Here is a really useful video of a macaron chef folding in the sugar and almond (and cocoa for her macarons) and performing macaronnage until it reaches the critical consistency.
Pipe macarons onto parchment paper or a silpat-lined pan using a 1/4-1/2" tip. Allow the macarons to sit at room temperature for 10 to 30 minutes, until they are dry to the light touch. Preheat the oven to 375° and bake the macarons for 15-18 minutes.
Et voila! Macarons. Sandwich with buttercream and you're all set!
 |
| Buttercreamed macaron! Not perfect thanks to the little bump on the top, but I actually think it's kind of cute! |
 |
| I used leftover caramel buttercream and gave it a little color for contrast. |
|
|
|
|
|
Délicieux!
•
•
•
Azara


