Sunday, May 27, 2012

Maybe Not Totally Perfect but Still Really Awesome Macarons

At the front left corner you can see what happens when you try to peel off a macaron before they've cooled...


This was my third try for macarons; the second try had come out behaving very much like meringue, and the first try spread into weird little misshapen puddles and kind of burned on the bottom. Delicious misshapen burnt puddles, but on a certain level with the macaron shells taste is only half the battle, perhaps even less. The other key elements to a macaron, as far as I can tell, are a) visual appeal: smooth, lustrous surface and development of a solid pied, the little crackly 'foot' at the base of the shell which I will discuss further in a minute, and b) mouthfeel: a somewhat crisp shell with a softer almost fudgy center. The goal here is to avoid gummy chewiness or the texture of a meringue by observing a proper period of macaronnage, a process in which the batter is repeatedly spread against the side of the bowl in order, again as far as I can tell, to reduce air bubbles and create a molten lava-like texture in the batter.

So third time is apparently the charm! What I did differently for this batch from the previous ones was not overbeating the meringue and macaronnage-ing like it was my job.
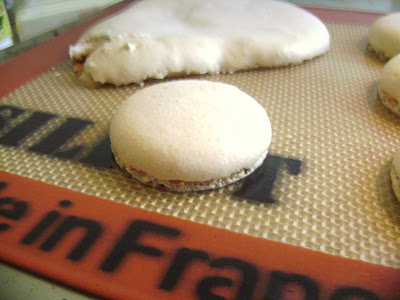

The payoff? Smooth tops, solid pied.


Pied! Yes!

The recipe I use for macarons is from I Heart Macarons by Hisako Ogita. As are most Japanese sweets cookbooks, this book is pretty precious with beautiful photographs and extremely cute ideas for presentation. There are plenty of flavoring instructions for shaking up the plain macaron shell base, including green tea, black sesame, raspberry etc.

The book also includes instructions for making many different flavors of buttercream to be sandwiched by the macaron shells, although I have always had leftover buttercream to use. Also in the book are suggested flavor combinations that look pretty incredible. Maybe I'll get adventurous next time!


Italian Meringue Macarons (Makes about 12 sandwiched macarons)

2/3 cups ground almonds
1 1/2 cups powdered sugar
2 Tbsp water
5 Tbsp granulated sugar
3 lg egg whites 
1 tsp vanilla

Sift together the ground almonds and powdered sugar three times. Set aside.

Boil the granulated sugar and water until it reaches 240°. As soon as it does, start whipping the egg whites at high speed. Beat until they reach the soft peak phase, at which point the sugar syrup should be around 248°-250°. Slowly pour the sugar syrup into the egg whites with the mixer still going, pouring it down the side of the bowl in order to avoid splattering on the beater. Turn up the mixer to high speed and beat until the bottom of the bowl is cool to the touch. 

Fold in half of the sifted sugar and almond mixture and fold in until just incorporated. Fold in the remaining sugar and almond and begin the macaronnage.

For Macaronnage:

Scoop up the batter with a spatula and press it along the side of the bowl. Repeat about 12 times, although you want to look for a very particular consistency, like of molten lava, and if you haven't achieved it after 12 turns, keep going. Here is a really useful video of a macaron chef folding in the sugar and almond (and cocoa for her macarons) and performing macaronnage until it reaches the critical consistency.

Pipe macarons onto parchment paper or a silpat-lined pan using a 1/4-1/2" tip. Allow the macarons to sit at room temperature for 10 to 30 minutes, until they are dry to the light touch. Preheat the oven to 375° and bake the macarons for 15-18 minutes. 

Et voila! Macarons. Sandwich with buttercream and you're all set!


Buttercreamed macaron! Not perfect thanks to the little bump on the top, but I actually think it's kind of cute!


I used leftover caramel buttercream and gave it a little color for contrast.


Délicieux!
 • 
Azara


Saturday, May 19, 2012

Chris' Southern Disco Kitsch Pineapple 7-Up Birthday Cake

This one goes out to everybody with a crazy sweet tooth. Chris' SDKP7UBC was a massive effort, but it led to a major payoff. This cake got me the coveted "this tastes like my childhood" compliment from my friend Karma, a native of South Carolina. A clear win for the recipes I will be sharing in this post! But first, some terrible pictures (some day I will get a new camera... promise).

So kitschy! So Fabulous.


Little stars piped on top.


My friend Meghan working on a sidewalk chalk rendition of the cake.

Aaaand recipes:


7-Up Cake (adapted from the Whiteout Cake from BAKED bakery's first book. Love their stuff)

5 cups cake flour
1 1/2 cup all-purpose flour
2 Tbsp baking powder
2 tsp baking soda
1 1/2 tsp salt
1 cup butter, at room temp
1 cup vegetable shortening
2 cups sugar
2 Tbsp vanilla
2 large eggs at room temp
3 cups (1 normal-sized bottle, like not the giant one) ice cold 7-Up
6 large egg whites at room temp
1/2 tsp cream of tartar

Preheat the oven to 325°. Prep two 2" high 8" round pans and two 2" high 7" pans or one 3" high 8" pan and one 3" high 7" pan. (For this recipe I found it better to bake smaller amounts of batter at a time, so if you only have one each of the 3" high pans then bake half the batter first, prep the pans again and bake the second half. This will prevent the delicate cake from collapsing under its own weight or over-baking)
Sift the flours, baking powder, baking soda and salt together into a large bowl. Whisk to combine.
Beat butter and shortening for 3-4 minutes until creamy and lightened. Add sugar and vanilla and beat for 3 more minutes. Add eggs one at a time, beating continuously until completely combined.
Add flour mixture in three additions, alternating with the soda.
Whisk/beat egg whites with cream of tartar until soft peaks form. Check often and do not overbeat! Fold the egg whites into the batter.
Dole batter into prepped pans until half full and bake for 35-45 minutes: keep an eye on this one! You want to pull it out as soon as its finished to avoid over-browning and drying of the inside of the cake.


Macerated Pineapple (Makes enough pineapple and syrup for the whole cake)

2 cups sugar
2 cups water
2 pineapples, chopped finely (looking for roughly quarter-inch pieces)

Create a simple syrup by cooking the sugar and water together and boiling for five minutes.
Cook the pineapple in the syrup, boiling for about 10 minutes. Remove from heat and let stand for at least 8 hours.
Drain and reserve syrup for soaking 7-Up cake layers. Add a little rum if you like!


Pineapple Italian Meringue Buttercream

2 lbs butter (eight sticks) at room temp
2 2/3 cups sugar
1/2 cup water
7 egg whites
1 1/3 teaspoons cream of tartar
2 tablespoons vanilla
1/2 recipe Macerated Pineapple (above)

Beat the butter until smooth, light and creamy, about 3-5 minutes. Reserve. Thoroughly wash and dry bowl if using a stand mixer.
Cook sugar and water over medium heat to 240°. As soon as it reaches this temperature beat egg whites and cream of tartar together in a clean bowl at high speed until the soft peak stage. By now the syrup should have reached between 248° and 250°; remove from heat and slowly pour into the egg whites down the side of the bowl as the mixer remains at medium. Turn it up to high and whip until the bottom of the bowl is cool to the touch.
Turning the mixer down to a low setting, add the butter in a spoonful at a time, beating well after each addition. Add the vanilla. Divide in half and reserve one half for frosting the cake.
Put the macerated pineapple in a food processor or blender and blend well. Fold into half of the buttercream.

*Note: this buttercream may weep a bit; keep this in mind when soaking your layers, by which I mean do not oversoak in order to leave a little room for the pineapple juice that may leach out of the buttercream.


To Assemble the Cake

Split the cake into however many layers you wish. I did seven and seven to play on the 7-Up content of the cake. Nobody got it until I said something. Such is the plight of the detail-oriented baker.

Soak each layer in the maceration syrup and spread on a thin layer of pineapple buttercream. Use the reserved macerated pineapple to add some texture to some of the layers of buttercream; I put it in the two middle layers. Continue until you reach the final layer of cake, and then frost the cake in the reserved plain vanilla buttercream. I fortified the bottom tier of cake with some chopsticks that I cut down to size. Decorate as desired.

Bake Hard!
Azara